Rendering the Alexa Presentation Language in SwiftUI (with bonus Moose)
What if you wanted to render a dynamic UI in SwiftUI, where you knew nothing of the view hierarchy at compile time? One that was downloaded at runtime from the internet? One that could change in response to user action or server events?
Building on an Alexa Voice Service engine
That is the situation I found myself in at the start of this year. I already had an Apple Watch and iPhone app that could talk to the Alexa services, so that you can control your smart home, ask questions and yes, view shopping lists.
But the technique I used for rendering shopping lists used an outdated technique called Templates, which Amazon is well on the way to deprecating.
The Alexa Presentation Language
The Alexa Presentation Language is relatively new, and contains a data-bound hierarchical series of UI components (Container, EditText, Frame, VectorGraphic, etc.), each with a common set of properties, and component-specific properties.
APL Documents are JSON documents which describe the APL components to be rendered, like this.
{
  "type": "APL",
  "version": "1.8",
  "description": "A simple hello world APL document with a data source.",
  "theme": "dark",
  "mainTemplate": {
    "parameters": [
      "helloworldData"
    ],
    "items": [
      {
        "type": "Text",
        "height": "100vh",
        "textAlign": "center",
        "textAlignVertical": "center",
        "text": "${helloworldData.properties.helloText}"
      }
    ]
  }
}
If you squint you can see how each of the APL components might be translated to a SwiftUI equivalent.
Rendering APL in SwiftUI
So I squinted very hard, and that is what I did. Using the open source Amazon APL Core Library written in C++, which does 90% of the work, and translates APL JSON documents into a tree data structure, I dynamically walk the tree and generate an equivalent Swift structure, consisting of Swift AplComponentWrapper classes which wrap their C++ peers, and which I then use to dynamically generate a SwiftUI view hierarchy.
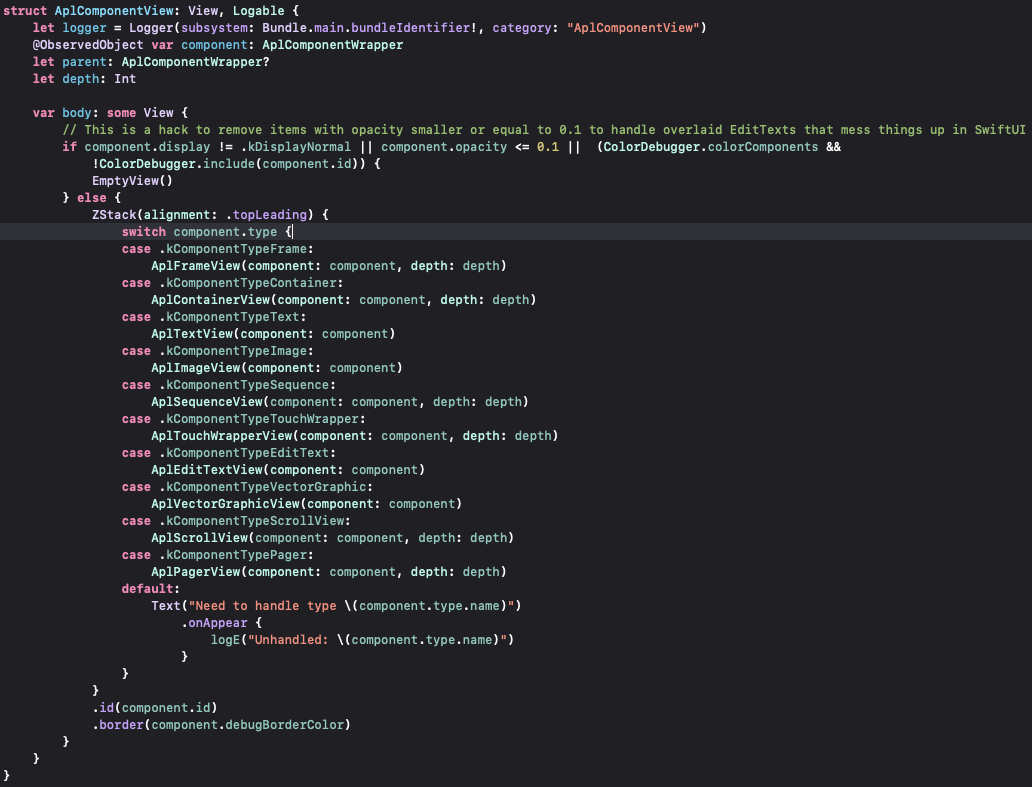
This is my AplComponentView which drives the generation of the SwiftUI views:

Each APL component type has a SwiftUI equivalent, which renders the APL component in SwiftUI.
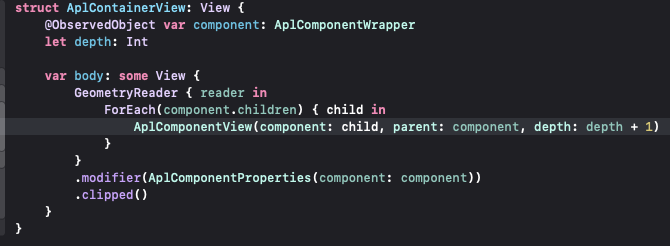
The APL Container component is easy to render, and it helps you see the recursive nature of the SwiftUI UI generation: each child is itself generated as an AplComponentView:

You also see the AplComponentProperties modifier which applies all those base properties that are common to each APL component.
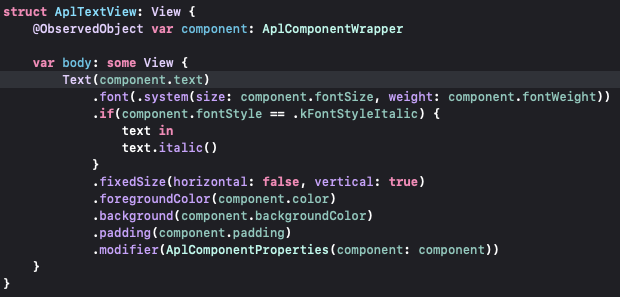
The APL Text component was equally simple to render:

By leveraging SwiftUI’s Observables I was able to dynamically update the SwiftUI UI when the APL Core engine generated events (commands) which updated the UI, for example when swiping on the screen to remove a shopping list item, the text’s offset is updated as you swipe, I’m not using the native swipe-to-delete functionality.
Some things were hard to do, and I have some hacky solutions (which autocorrect changed to whacky, also appropriate). This stuff also has to work across iOS and iPad OS, watchOS and macOS (and does).
SVG in SwiftUI
Some components, such as the VectorGraphic APL Component had no SwiftUI equivalent, and I ended up writing my own SwiftUI SVG interpreter and renderer which I’ve open sourced.
Swift and C++
One of the challenges in this project was writing Objective C wrappers for all the C++ APIs exposed by the APL Core Library.
That is a small price to pay for being able to build on top of the excellent work the Amazon team in both creating the APL core library, and also in designing it to be decoupled from their own renderers such that it could be re-used in a project such as this.
The result
The result of all this work is that the very same UI that runs on your Amazon Echo Show can now run on your Apple Watch:
It is far from complete, but it works in most situations. I’m doing this as a side-project, and the 80% solution is more than good enough. I’ve not open-sourced all of this work … it is still very much a work in progress, and I sell the app for a couple of bucks.
You can leave comments about this post here
If you give a Moose an Apple Watch
P.S. I started out this blog post in a very different way, but wasn’t convinced it worked, I lost steam, and decided to start again from scratch with this post. I’ve left it here if you want to take a look …
If you give a Moose an Apple Watch
